Ms Word 2010 Mailings Tab Lesson-7
Ms Word 2010 Mailings Tab Lesson-7
Mailings:-The Mailings tab provides features related to mail merge, such as envelopes, labels, merge fields and so on as icons.
Envelopes:- MS Word provides a feature to add an Envelope directly into the Word Document, and it is ready to get printed with a click. It also provides the Label feature, in which we can provide the address/information we want to get on the label, select its quantity, and good to go for printing on a click. Detailed use and steps with examples of Envelopes and Labels are as follows Envelopes are used traditionally everywhere. It is a simple mode of communication between the sender and the receiver for e.g., Invitations, Congratulatory messages, etc. We can get an envelope inserted into our Word Document directly following the steps
Lables:- Go to Mailings > Labels.Select Options and choose a label vendor and product to use. Select OK.If you don’t see your product number, select New Label and configure a custom label.Type an address or other information in the Address boxTo use an address from your contacts list select Insert Address .To change the formatting, select the text, right-click, and make changes with Font or Paragraph.Select OK.Select Full page of the same label.Select Print, or New Document to edit, save and print later.
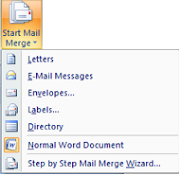
Start Mail Merge

There are two ways to create a mail merge.
Use the mail merge wizard.
Use the commands on the mailings tab.
Step By Step Mail Merge Wizard:-
To use the mail merge wizard :
In a black Microsoft word Document, click on the mailings tab and in the start mail merge group, click start mail,merge.Click step by step mail merge wizardIn step 1 of the mail merge wizard , select your document type. We will select letters. Click Next Starting document
In step 2, select the starting document. We will use the current (blank) document. Select use the current document and then click Next. Select recipients.5. In step 2, select recipients . We will create a new list, so select type a new list and then click create. Create a list by adding data in the new address list dialog box and clicking Ok Save the list Note that now that we have create a list, the mail merge wizard reverts to use an existing list and we have the option to edit the recipient list.Selecting edit recipient list open up the mail merge recipients dialog box, where we can edit the list and select or unselect records. Click ok to accept the list as it.Click next. Write your letter.In step 4, we write the letter and add custom fields.In the insert address block dialog box,check or uncheck boxes and select options on the left until the address appears the way you want it to. Note that you can use match fields to correct any problems. Clicking match fields opens up the match fields dialog box, in which you can associate the fields from your list with the fields required by the wizard In step 5, preview your letter and click next. Complete the merge.In step 6, click print to print your letter or edit individual letter to further personalize some or all of the letters.
Edit recipients list:- Displays the "Mail Merge Recipients" dialog box allowing you to change or filter the list of recipients.
Write & Insert Fields
Highlight Merge Fields - Highlights all the fields in the active document that have been inserted. This makes is easy to see what will be replaced.
Address Block - Displays the "Insert Address Block" dialog box. This allows you to customise how the address will be inserted.
Greeting Line - Displays the "Insert Greeting Line" dialog box. Lets you add a greeting line to your document.
Insert Merge Field - Button with Drop-Down. The button displays the "Insert Merge Field" dialog box. The drop-down allows you to quickly insert a merge field just by clicking on it in the list and contains the commands: Title, First_Name, Last_Name, Company_Name, Address_Line_a, Address_Line_2, City, State, Zip_Code, Country_or_Region, Home_Phone, Work_Phone, Email_Address.
Rules - Drop-Down. Lets you add decision making rules to the mail merge. The drop-down contains the commands: Ask, Fill-in, If-Then-Else, Merge Record, Merge Sequence, Next Record, Next Record If, Set Bookmark, Skip Record If.
Update Labels - Only enabled when creating labels. Updates all the labels in the document to be consistent with the first label.
Preview Results
First Record - View the first record in the recipient list.
Previous Record - View the previous record in the recipient list.
Next Record - View the next record in the recipient list.
Last Record - View the last record in the recipient list.
Find Recipient - Displays the "Find Entry" dialog box to search for a particular text entry
Auto Check for Errors - (Alt + Shift + K). Displays the "Checking and Reporting Errors" dialog box. This allows you to simulate the mail merge and to specify how to handle any errors that occur during mail merge. You can even simulate the merge and report errors in a new document. Finish & Merge - Drop-Down. The drop-down contains the commands: Edit Individual Documents, Print Documents and Send E-mail Messages.
Finish
Finish & Merge:- After previewing the form letter, click on Finish & Merge to finish the Word mail merge process. From the drop-down list that appears, you can choose to: Edit Individual Documents — if you want to edit each letter further, separately. ... Send Email Messages — if you want to send the letters as emails.


Comments
Post a Comment